
TL;DR
If you hear a squeaking sound when you’re using your volume knob, I think it might be the potentiometer that’s broken. I replaced it, and now it works!
My beloved Logitech
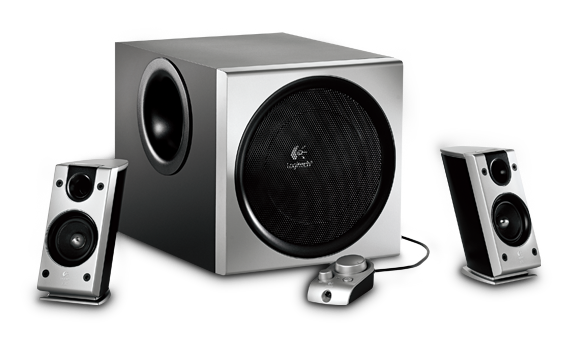
The Logitech Z-2300 were my first own computer speakers that I bought. I think I still lived at my parents house. My brother got them first, and they just sounded awesome. I never heard any other computer speaker set sound better than this.
Unfortunately after a few years, the speakers started to make squeaking sounds when I turned the volume knob. Also sometimes one channel failed; I would only hear the left or the right speaker. At this time, Logitech didn’t produce the speakers anymore, so there was no chance of getting them repaired by them.
Replacement control pod
So then of course, you find yourself googling for another solution. The speakers where fine, so it would be such a waste to replace the whole set, just because the volume knob gave up.
The first time I did my research, I found a guy who reverse engineered the thing. Then he designed an improved version of the control pod, which he would sell on ebay. I was almost going to buy this, but with shipping and all, this would cost me over 50 euro’s.

On our local ebay, I found whole sets for the same price as what this replacement pod would cost me.
So this is what I did, I bought a complete set, just to replace the control pod. The other speakers did come in handy though, because I would take them whenever we would go to a party weekend with our friends. I didn’t have to worry anymore if the speakers would get blown up, or flooded in beer.
Meanwhile, I already asked a friend who I knew owned such a set too, if he was still using his set. He wasn’t, so I could get his control pod. It wasn’t until recently though when I got my hands on it, and actually I tried it a few weeks ago.
You can probably guess: same issues.
Schematics found
So eventually I did another round of research, and found this technical guy that took apart the control pod as well and reverse engineered it. He posted his findings in a blog.
I am very interested in electronics, Arduino’s, soldering stuff, but reading this (simple) schematic was a little too complicated for me. If I could order the PCB I would, but the link didn’t work.
In the comments though, the author was kind enough to tell us what potentiometer we would need to replace it.

So I searched on my favorite site AliExpress, and what do you know .. there they were!
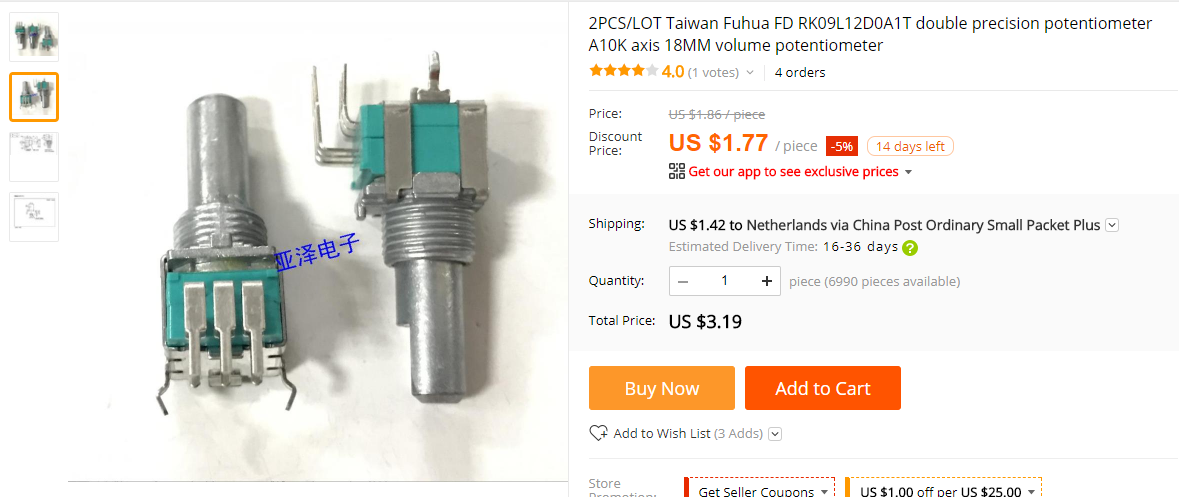
For this kind of money I thought I could give it a shot. Well, also because I had two control pods, of which one was already broken anyways. So in this case there wasn’t that much of a risk.
Replacing the POT
To be honest, I did some soldering before, and already had some equipment in home. Not professional stuff, but enough to get me started. My de-soldering techniques are horrible, so I just cut the six legs of the potentiometer on the board. The I cut away the glue with a utility knife.
Then I first started pulling the potentiometer itself, trying not to break the PCB board. Then the potentiometer itself started to break. So I used my pliers to break it apart. There was still some of the potentiometer left on the board, but I stuck my screwdriver under it and started to move it. Eventually the whole thing launched like a rocket.
Now there was room enough. I cut the legs of the potentiometer as high as possible, so that I had enough left on the board to get them with my pliers. Now it was quite easy to de-solder them, because I could pull the remaining legs out one by one while heating it with my soldering iron. I used some de-soldering wick to get the last solder out, and get the holes open again.

I removed some more of that white glue, so make sure the new potentiometer would fit. And it did.
So now it was very easy to solder the new one. Unfortunately I forgot to make a picture of this too, but well, in the end it worked.
This probably won’t solve all the problems with the control pod, but for this kind of money I guess it’s worth a try. It’s also relative easy, because the pod is large, so the item is easy to remove.
Let me know if it worked for you!
Just use some contact spray and/or be gentle with some sewing machine oil on the potentiometer. Did the job for me a few years ago, never had an issue after
Hello everyone. Okay, here’s my story. I own a set of z-2300 for almost 12 years now, and they still work perfectly fine except for the control pod part. Now, there is a safety stop at minimum vol. and maximum vol in the potentiometer. Well, that safety stop one day broke and now i can go from minimum vol. to max vol. and vice versa from below (meaning the potentiometer can do a whole 360 now). That wasn’t my problem at all though, as it was too trivial to bother. All i needed to do is to watch out with the potentiometer’s place before i press the power button. Now the real problem comes in several months after this happened. I inserted my headphone earbuds in the jack, and when i removed them the speakers worked no more. Tried everything and still nothing, so i said what the hell, if its broken i cant break it more so i opened the control pod myself. I tried to experiment with the headphone jack socket and guess what? One speaker started to work and the other one played static. So what i need to do now is to replace that part of the control pod but neither i know how its called, nor i know where to find it. I honestly dont want to give up on this speaker set, as it still is one of the best speaker sets and really loud and dont want to spend like 350$ (euros on my part) to find a similar speaker set.
First of all; if I check our local ebay (marktplaats.nl) I see a whole set for around 50 euro’s. So that’s not even close to 350 euro’s. You could buy another set just to replace the pod; in my case this was cheaper than buying the ebay control pod on ebay. But even the replacement pod, as I linked to in my post, doesn’t cost 350 euro’s.
Having said that, of course it would be cool if you could just fix your pod. So can’t you just replace the heackphone jack socket? Not sure if that’s the problem; I suppose you could replace the potentiometer as well while you’re at it. If I remember correctly the volume is also working for the headphones right? So I suppose the audio for the headphones is also coming through the potentiometer.
Maybe you could even wire another headphone jack to the solder point just for testing, and if it works, replace the headphones jack in de control pod. Although this may be tricky, getting the old one out and putting the new one in, without conflicting too much damage to the pod.
I’m very curious if you are able to find the problem and fix it yourself. So please drop a note if you found the solution :-).
Hello,
Just happen something similar to my grandpa Z-2300 (~15 yrs old I guess), one speaker just lost 90% of its sound power due to the jack misfunctionning. As Logitech took the silly idea to plug a non-replaceable jack, my options are:
1) Trash everything and buy a complete new system. Expensive and which one ? Z-2300 remains one the best ones. And trashing everything just because of one cable is just unacceptable. And I didn’t see any used Z-2300 for sale on the French ebay (le bon coin)
2) Buy a new remote controle like the one your just showed. I would gladly buy it at ~ 15€. But at 50€ it’s a pure scam. And what’s more, many comments are bad around its quality of functionning. Bad idea
3) Repair the misfunctionning jack myself. The issue is that I have 0 skills in soldering and I don’t have any soldering iron. Could be the opportunity to learn but I’m afraid to fuck everythin up.
Contrary to you, I don’t have to fix the while control pod but only the jack (I guess!)
If you have any advice on how I could proceed it would be very much appreciated !
Thanks again,
Den
I think replacing the jack isn’t that hard, because it’s all pretty large. The pins are rather large, so it’s probably almost impossible to screw up. As a first step, you could at least open the control pod, and study how the jack is soldered to the PCB. I think you will find there are two large pieces of metal that go through the PCB. So if it’s really just the jack, I think you can replace it, even without soldering skills. Watch a few YouTube video’s about soldering and just try it. You can’t break anything that’s already broken, right?
Another option that occurred to me the other day was that you could replace the entire amplifier board. For example, check this one out: https://www.banggood.com/nl/DC12-24V-TPA3116D2-2_1-Channel-Digital-Subwoofer-Power-Amplifier-Board-p-1075392.html .. it’s a 2.1 amplifier board that is really cheap. Then you should wire the speakers directly to this board; so I guess there’s still some fixing to do. Especially wiring the subwoofer might be difficult, because it’s pretty hard to reach. Anyways, if you screw up the entire control pod, this might be an option as well. If you want to try this, check out the blogpost I refer to on jseaber. It describes the pin layout of the connector to the sub, so you could even buy a connector like that, and wire that up to the amplifier. You could buy a VGA cable with a female connector, cut the other connector of, and then use the wires in the cable to connect to the amplifier.
If you need more help on that, feel fee to contact me.
Hi Rolandow,
I’m having a problem with the headphone jack. It only makes good contact when I use a rubber band or scotch tape to hold the plug to one side. I’ve taken it apart and I think it is a 6 pin jack. Any idea who might sell these?
I also have a similar issue. Z2300 from about 2009, BEAUTIFUL sound, and beautiful speakers. Just recently when I plug the 3.5mm headphone into the control pod jack, only one speaker works until I rotate the pin inside the jack to find the “sweet spot” This generally involves pointing the “L” shaped end of the headphone male pin so that it “points downward”, contacting the silver casing and putting a lateral pressure on the jack. Very similar to the above solution of using a rubber band to create what i suspect is the same lateral pressure. There is also a noticable slight increase in hissing when wearing headphones only, wheras I recall a few years ago, it was near silent.
I have no realworld experience with soldering, only watching youtube videos. I suspect that simply a pin is slightly loose and needs to be reseated, resoldered. But I am also afraid to open the casing and damage it further, since it somewhat works still. I also wouldnt know what part number to replace the jack with.
Imho there is no risk in opening the case to take a look, unless your use a sledgehammer. Just handle with care and you can always close it again exactly the way you opened it.
Hello. Can confirm that i ordered the ALPS RK09L12D0A1T potentiometer as recommanded above and replaced it myself with a soldering iron and it works just fine. You have to be carefull because the copper traces are verry old and thin and 2 of mine broke when desoldering. I used a solder pump but still they broke. Ordered mine from a site called adelaida.ro here in Romania. Thank you guys for all your help.
Great news that you succeeded! I think I wasn’t as carefull as you described. I think I first cut the pins of the potentiometer to remove it, and then removed the remaining pins by heating them and pulling them out with pliers.
The solder pump did a great job. I tried my best not to damage the original potentiometer im case the new didnt work. Thank you for all your help with this thread.