Piwigo nginx problems

By piwigo website was broken; when I uploaded new pictures, they would not appear on the page. At first I thought resizing with GD was the problem, but switching to Imagick didn’t help either.

The rewrite rules of nginx turned out to be the problem.

I had a location block in my virtual host that would serve static files directly. But this rewrite rule was hit while the uploading process was trying to use the i.php script for processing the upload.

The easiest way would be to just remove the static file serving part, but instead, I tried looking for a regex that would still serve static files directly, but just not the ones that needed processing. So, in fact, the ones starting with /i or /i.php.

So, eventually my virtual host looks something like this:

Google Family Link won’t unlock your child’s device

You’re on a holiday with your mobile home, no WiFi, lots and lots of stuff to play with for your kids. Board games, books, toys, climbing equipment, swimming pools. So what do they want? Their tablet or mobile phone, obviously.

Same here.

So at the end of the day, our kids are usually allowed to spend a little time on their devices. Being a responsible parent using Google Family Link, you add some bonus time, or try to unlock the device, which somehow doesn’t work. The device doesn’t have WiFi, so the Google Family server can’t reach your child’s device to tell it: hey, it’s okay, you can unlock now.

Normally we just enter the parent code, and then it’s unlocked for the rest of the day. This usually works even when WiFi is unavailable. Except this time, that didn’t work either. I guess the parent codes are being refreshed once in a while when the device has internet access. Maybe if a device hasn’t been connected to the internet for a while, it is unable to refresh these parent codes?

Anyways, rebooting the device didn’t help either. What options do you have left, when you cannot do anything because the tablet is locked?

Mobile hot spot to the rescue! Simply use a phone that has mobile data through 4G or whatever. Create a WiFi hot spot with the same network name and password as at home, which the tablet already knows. The tablet will connect to your phones hot spot, and now you will be able to unlock it using a Google Family key, or just disable the limits or whatever.

I just tried this with my son, and in his case, this works!

After the tablet is unlocked, disable the hot spot and off you go.

Outlook keeps asking for password

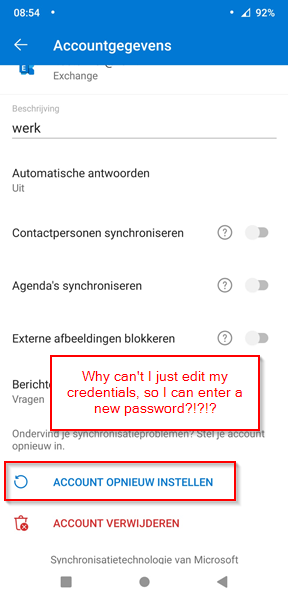
At work, we are required to change our passwords every 8 months. It’s company policy, you there’s no way around it. Every time this happens, I have problems with Outlook after that password change. When my Outlook desktop application in Windows starts, an old school grey popup appears that is asking for my password. The “Remember credentials” checkbox never seems to work.

Anyways, after this password change, the popup almost immediately pops up again. And again. And again. And again. Until up to the point when I desperately call by IT colleagues.

Today I found out that my account is simply blocked. After a attempts, logging in with the wrong password, the account is automatically disabled.

The thing is, I also use the Android Outlook app, to be able to read e-mails on my phone. After I change my windows credentials, I know I should also change this in the app. Except, I couldn’t find a place where to do this. The only option in my Exchange settings is to “reconfigure” the account, whatever that means.

So, my Android app probably keeps hammering the exchange server with wrong credentials, hence my account is locked.

Today I managed to get into the credentials settings in the app; I don’t know how though. I pressed the “reconfigure account” button, but nothing seemed to happen in the first place. Then after a while, it suddenly said, ok, you should enter your password. Which didn’t work in the first place of course, because my account was locked (again!).

So, I still don’t know what the right procedure is exactly, but I can save myself a lot of time googling for a solution. Because when your account is simply locked, I guess no solution on Google will work anyways.

Resize Ubuntu disk in VirtualBox

So after developing for a couple of years on my VirtualBox Ubuntu server, the 32GB I had allocated wasn’t enough anymore. So I wanted to add some additional space, without loosing my files of course. I have a Ubuntu Server 18.04 with a LVM partition. So I would see something with /dev/mapper/blabla in the df -h.

As with a lot of things that I wrote on this blog, I couldn’t find an easy step-by-step thingy to follow for my specific case. Most of the examples used gparted, but I have Ubuntu Server, so no GUI at all. Others used the VBoxManager command to resize the disk.

In hindsight it was pretty easy, so, let’s go.

Step 1: resize the VirtualBox image

You can use the VirtualBox UI to do this pretty easily. Make sure your virtual machine is shut down. Then go to File, Virtual Media Manager. Select the disk image that is bound to your virtualmachine, and use the slider to add space to your disk image.

Step 2: resize the partition

I couldn’t find a decent way to resize the partition using the console, that I would dare to execute without being afraid to loose all my files. Eventually I found the link to the gparted live cd.

Download it, and mount it as a live CD to your virtual machine.

Now just boot your virtual machine, and boot with the default settings. You will end up with a bare GUI, start gparted. In my case, my swap partition was at the beginning of the partition table. That was easy; because I could just resize the existing partitions. If your swap partition is in the way, just remember the size, delete it, and create it afterwards (as suggested in this youtube video).

As in this video, just select the partition, right click, and select Resize. I did this for both the extended file system on /dev/sda2 as the LVM partition.

After you selected Resize, just move the slider to the right. So first for /dev/sda2, then for /dev/sda5.

Now remove the live CD, and boot your virtual machine again.

Step 3: expand LVM

Now you need to expand the LVM partition. That’s just two commands.

and after that:

Of course you need to change the /dev/mapper/blabla thingy to whatever your LVM partition is.

That’s it! df -h now shows the new size.

Bluetooth issues? Buy a dongle.

After a few years of hard work, my laptop had served his purpose and was being replaced with a newer one. I now have a HP ZBook Fury 15 G7 with everything a developer could wish for. Computers are never too fast of course, but this one comes close. Unfortunately, my new Bluetooth adapter was pretty bad.

I have a lot of headphones; I think it might be an obsession. But my excuse is that I have a few at work, and a few at home. On my previous laptop, this wasn’t an issue at all. Actually I was surprised how Windows seemed to always exactly know what the preferred headset was for my conference call.

But with my new laptop, these days were over. The most common problem was that I could not hear the others, but they could hear me. So basically the Bluetooth connection to the headset was working, but it’s not just functioning well. Rebooting the laptop helped. If, after the reboot, I started calling, the headset worked perfectly. But then suddenly a few hours later, or when switching it off/on, it would mysteriously stop working. Yes, I know I can select what device Teams should use, this was all set correctly.

Bluetooth settings in Windows 10Old school sound settings in Windows 10Bluetooth devices nowadays have different profiles, to provide the best experience for each usage. This means that when you want to use your headset for a call, it switches to “voice” mode, which uses different codecs than for music. My theory is that switching between these profiles doesn’t work properly in my case. Maybe some software or resource is keeping the handler open to the “music” profile, while it should switch to “voice” when needed. So voice should take precedence above music. I tried disabling the music profile for some devices in Windows, which is possible, but it didn’t help a bit.

Eventually I was so fed up with this, I impulsively bought a Bluetooth dongle. Since I have two MPOW headsets (H21 for music, M5 for calls), I figured buying a MPOW dongle would probably work best. So I went to my friend Ali, and this time didn’t choose the cheapest option. I bought the Mpow BH519 and hoped for the best. Maybe, just maybe, the problem was within the Bluetooth protocol itself. Maybe some older Bluetooth adapters cannot handle this profile selection thingy at all.

Well, the title of this post already mentioned it of course: it seems to work! Even the cheap bone conducting headphones that wasn’t able to reconnect the music profile at all now suddenly works like a charm.

So, stop tormenting yourself and buy that dongle. And HP and other manufactures: go fix your Bluetooth adapter :-(

By the way, the story continues (a bit). I thought I was being smart by disabling the Bluetooth adapter in my bios, so Windows wouldn’t get confused about which adapter to use to pair with my headphones. At home I don’t use Bluetooth, so for me, so I plugged the dongle in my docking station at work, and I should be fine.

But Windows is still a bit silly. The Bluetooth that were paired to my, now disabled, Bluetooth adapter still show up in my devices, but I cannot remove them. Computer says “remove failed”, that’s it. I could however pair my Bluetooth devices to the new dongle, but now their name was something like “2- V11 Headphones”. It was prefixed with a 2. That annoys the hell out of me.

When I was at home, without the Bluetooth dongle, I re-enabled the Bluetooth adapter in my BIOS and tried removing the devices. Still didn’t work. I had to go to the old school Windows 7 window as shown in the picture above, and from that list I was able to remove the devices.

So my advice would be to remove these Bluetooth devices before you begin. Then disable your Bluetooth adapter in the bios, and then insert the Bluetooth dongle. That would probably keep things as neat as possible.

Update 8 aug 2021: Today I noticed a Bluetooth driver update in my Inter Driver Support Assistant. Wow, I didn’t realize I was such an influencer! Of course I immediately installed this, and so far, it seems to work a whole lot better. Maybe driver version 22.60.0.6 solved my problems. Thanks HP!

Mosquitto not authorised

So this morning, I found almost all my sensors and modules were unavailable in Home Assistant. I soon realized that something was wrong with my MQTT. I checked my syslog and found out that Mosquitto had been upgraded from 1.6.12 to 2.0.7. Apparently I used snap to install a recent version on my Ubuntu system, and apparently this upgrades automatically.

This was a typical “install and forget” package, a long time ago. I left all the setting to default. I didn’t even create a config file. So now I had to troubleshoot before the whole house woke up and started complaining.

So, first of all, it uses Snap. I found out by using netstat -tupan | grep LISTEN to see the PID that was listening on port 1883. Then ps aux | grep 13479 gave me this:

Snap has it’s own folder structure, so that’s why I couldn’t find /etc/mosquitto/mosquitto.conf or something like that. On this Mosquitto Snap page I found out that instead you go to /var/snap/mosquitto/common. If you go back one folder, you see that common is a symlink to a number. In my case I used to have 387, now it has 533. Anyways, all I found there was a mosquitto_example.conf.

I figured that the default settings didn’t allow anonymous connections anymore. So I copied mosquitto_example.conf to mosquitto.conf in the /var/snap/mosquitto/common folder and started editting. I’ll save you the trouble if you are like my and just want it back the way it was. I needed to uncomment the lines bind_address and allow_anonymous. So the settings are:

Then I found out that sudo systemctl restart mosquitto doesn’t work either. Even the service management of snap packages is different *sigh*.

So with sudo snap services you can list the services that you have installed with snap. To restart my mosquitto I had to do:

Then all devices and services were connecting again, and all came back to normal. Next step is to add authentication and migrate all devices over to an authenticated connection.

I will probably remember that on a next upgrade.

WordPress nginx update problem

So, this post is probably just a reminder for myself. For years now, I had this stupid problem when I wanted to update a plugin or theme on my wordpress site. On my VPS, I also have a cronjob running which takes care of most of the plugin updates automatically. With a bash script I loop through all my wordpress folders on the server, and then use wp-cli to update the stuff I needed.

I always assumed that this mechanism screw up the ability to update by the browser. Maybe file permissions were overwritten, maybe ownership. I always though: I have to look into this some day. Of course, each time I login to my wordpress and I see pending updates, I still try if it maybe magically works this time. Then the sad smiley face shows up, and I have to remove my .maintenance file manually. Very annoying.

Today I found out that when I wanted to browse the detail of the button, this smiley face also turned up. I finally check my console in the browser, and googled the error that was displayed there.

Then I found out about the X-Frame-Options that were indeed set to DENY in my nginx config (in /etc/nginx/snippets/ssl-params.conf).

I commented this line, and now the I-Frame with the plugin details is working again. I expect that this also solves my problem of not being able to update.


3 pin DC jack wiring

I didn’t really understand or know about the use of three pins on a DC connector. Until yesterday, when I wanted to add a DC connector to the bedroom light of my son. The parts I used probably doubled our tripled the value of the lamp, but well, since my new hobby is fiddling with Arduino’s I figured I should be able to do this. This way I don’t need to change the batteries every 2 weeks.

So in my quest how to do this, I found this post that says that a DC jack connector with three pins usually have two pins shorted when the DC connector is not plugged in. It’s meant exactly to do this; support battery power and power from the wall socket. In hindsight this post also put my mind on the wrong track, because I thought the pin 2 and 3 were supposed to be +.

When I got my DC Panel Mount Connector I took it to my multimeter to do some measures before blowing up my sons light. I found out that indeed two pins were shorted when the DC adapter wasn’t plugged in. But when I plugged it in, one of the shorted pins turned out to be the -. So now I had an error in my mind; from my point of view, the + and – were upside down.

Turned out they indeed were, but that doesn’t mean it can still work. It took my a while to figure it out, and I couldn’t find a clear instruction or image through google, so for all other newbies.. here we go.

So when you plug in your DC adapter you should be able to find out the plus and min that are now connected. The plus is the inner pin of the jack. One of the other pins is the -. If you touch those, you will read a voltage on your multimeter. You now found pin 1 (positive) and pin 2 (negative).

DC Jack 3 pin wiring

Now when you disconnect the DC, when you put your multimeter in ‘beep’ mode, you can find pin 3 by touching pin 2, and testing the other two. So pin 2 and 3 share the negative side (the -). Black wire. If this is the case, you have the same DC jack as me.

Now, to support both battery and DC adapter, you should connect pin 1 from the DC jack to your positive side of the circuit. The positive side of your battery also goes to this positive side of the circuit (yes, two + wires to the same point).

Pin 2 goes to the negative side of your circuit.

Pin 3 goed to the negative side of your battery. So when DC is unplugged, pin 3 is shorted with pin 2.

Logitech Z-2300 satellite repair

In a previous post I described how you could repair the control pod by replacing the potentiometer. But I had already bought an extra set of these Z-2300 to replace the control pod (which eventually also failed). This extra set was still useful, because I used this on our yearly trip with friends. Our party weekend without kids. This set already has enough volume and an amplifier, so this is much more portable than a normal set of speakers which would need an amplifier.

On those parties, the later it gets, the louder the music is wanted. So eventually the satellites blew up. Normally that would hurt, but since this was a spare set anyways, it didn’t really. I didn’t throw them away yet, and later I tried them again, and indeed, they didn’t sound that well anymore.

So then I figured: why not fix it, since fixing (or at least trying) electronics is my new hobby anyways. I opened the speakers and was a bit disappointed to see that the hole on top of the speaker was pretty much fake. There was only one speaker in there, and the hole wasn’t even open, so I can’t imagine it has a function.

On the other hand; now I only had to replace one speaker instead of two.

So I tried to measure the speakers a bit, and then went to my favorite website.

Soon I found out that all 3″ inch speakers were a bit too big. So then I tried searching for 2.75″ inch speakers.

Then I even found the original Logitech speakers.


But for this price I could also buy another set at our local ebay. Also I would probably blow them up again. So I continued my search, and eventually settled for this pair.

The sizes don’t match, but I figured somehow I would fit them in anyways.

So when they arrived I bent the edged so they would be more flat. Then I cut the wholes so I could use a screw with more flesh to fix the speakers in the original housing. This wasn’t really hard to do. I used a flat-nose plier for the bending and a normal cutter to remove the iron at the holes.

 
All sides bent …

Then I replaced the speakers in their holdings. Note that apparently Logitech switched + and -, because the red wire was connected to – and the black to +. I assume they know how to wire their speakers, so I decided to use the size of the connectors on the speaker as reference. So I put the red wire on the smallest connector and the black one on the largest.

My replaced speaker:Yes, the wires needed to be soldered, but that wasn’t really hard to do. Just heat up the iron on the speaker enough so the wire itself can melt.

Then put everything back together and hook ’em up. I must say that I don’t hear much of a difference. But I’m not sure what they will do on a very high volume. They might blow up as easily as the Logitech speakers.

I guess we’ll have to wait and see.

Network share cache

Problem

At work we have an iOS app that is communicating with a windows application. In fact, it communicates to a WAMP (Apache on Windows) server. On the first request, data is being sent, which is then passed to our Windows application. This application creates a PDF report on a network share. This report will then be fetched by the iOS app.

We had a problem though with fetching the content after the process was done creating the PDF. The file was there, but Apache didn’t see it yet, so it returned a 404. We created a workaround by requesting the URL in a for loop to see when the file was available, and then the creation process would end. In the Apache access logs we could see that after retrying for about 10 seconds, the file finally became available to Apache.

Network cache

The webserver is running on a different server as the fileserver. The file is being saved to a location on the file server. So after testing and debugging for a while, we searched how we might improve the performance of the network.

Finally we found this article by Microsoft, which documents some configuration settings that can be set in the registry. I didn’t think this would help, but we tried it anyways.

To my great surprise: it did work! Now the file was already present at the first request that was made by the Apache web server. So our performance increased 10 times.

The settings we added to the registry were:

FileInfoCacheLifetime: set to 1 sec
DirectoryCacheLifetime: set to 1 sec
FileNotFoundCacheLifetime: set to 1 sec

We added this settings on the client machine, so in our case the webserver that is reaching out to the file server. A reboot was not required. The next time we checked, the response was a lot quicker.

So this was a great improvement. We’re not sure yet what the cost of this change is, but since the servers are running on the same virtual platform, I don’t think there will be any downside to this setup. Maybe when you’re on a slow network these settings could make things worse. But for us this really helped.

Hopefully for you too.