Logitech Z-2300 Remote Control Pod fix

TL;DR

If you hear a squeaking sound when you’re using your volume knob, I think it might be the potentiometer that’s broken. I replaced it, and now it works!

My beloved Logitech

The Logitech Z-2300 were my first own computer speakers that I bought. I think I still lived at my parents house. My brother got them first, and they just sounded awesome. I never heard any other computer speaker set sound better than this.

Unfortunately after a few years, the speakers started to make squeaking sounds when I turned the volume knob. Also sometimes one channel failed; I would only hear the left or the right speaker. At this time, Logitech didn’t produce the speakers anymore, so there was no chance of getting them repaired by them.

Replacement control pod

So then of course, you find yourself googling for another solution. The speakers where fine, so it would be such a waste to replace the whole set, just because the volume knob gave up.

The first time I did my research, I found a guy who reverse engineered the thing. Then he designed an improved version of the control pod, which he would sell on ebay. I was almost going to buy this, but with shipping and all, this would cost me over 50 euro’s.

On our local ebay, I found whole sets for the same price as what this replacement pod would cost me.

So this is what I did, I bought a complete set, just to replace the control pod. The other speakers did come in handy though, because I would take them whenever we would go to a party weekend with our friends. I didn’t have to worry anymore if the speakers would get blown up, or flooded in beer.

Meanwhile, I already asked a friend who I knew owned such a set too, if he was still using his set. He wasn’t, so I could get his control pod. It wasn’t until recently though when I got my hands on it, and actually I tried it a few weeks ago.

You can probably guess: same issues.

Schematics found

So eventually I did another round of research, and found this technical guy that took apart the control pod as well and reverse engineered it. He posted his findings in a blog.

I am very interested in electronics, Arduino’s, soldering stuff, but reading this (simple) schematic was a little too complicated for me. If I could order the PCB I would, but the link didn’t work.

In the comments though, the author was kind enough to tell us what potentiometer we would need to replace it.

So I searched on my favorite site AliExpress, and what do you know .. there they were!

For this kind of money I thought I could give it a shot. Well, also because I had two control pods, of which one was already broken anyways. So in this case there wasn’t that much of a risk.

Replacing the POT

To be honest, I did some soldering before, and already had some equipment in home. Not professional stuff, but enough to get me started. My de-soldering techniques are horrible, so I just cut the six legs of the potentiometer on the board. The I cut away the glue with a utility knife.

Then I first started pulling the potentiometer itself, trying not to break the PCB board. Then the potentiometer itself started to break. So I used my pliers to break it apart. There was still some of the potentiometer left on the board, but I stuck my screwdriver under it and started to move it. Eventually the whole thing launched like a rocket.

Now there was room enough. I cut the legs of the potentiometer as high as possible, so that I had enough left on the board to get them with my pliers. Now it was quite easy to de-solder them, because I could pull the remaining legs out one by one while heating it with my soldering iron. I used some de-soldering wick to get the last solder out, and get the holes open again.

I removed some more of that white glue, so make sure the new potentiometer would fit. And it did.

So now it was very easy to solder the new one. Unfortunately I forgot to make a picture of this too, but well, in the end it worked.

This probably won’t solve all the problems with the control pod, but for this kind of money I guess it’s worth a try. It’s also relative easy, because the pod is large, so the item is easy to remove.

Let me know if it worked for you!

Auto update wordpress plugins using WP-CLI

After installing Wordfence to all of my wordpress sites, I receive a dozen e-mails a day about plugins that should be updated. I don’t use many plugins, so usually I just go ahead and update them with wp-cli, because I feel they are safe to update. Main advantage of the wp-cli is that I don’t get http timeouts or stuff like that.

Updating all the plugins for multiple sites (I think I have about 10 of them) did become a repetitive task, so I wrote a little shell script for it. Of course you have to make sure that all the websites can be auto updated, or if there may be a plugin that will break after an update. So only use this if you are certain you just want to go ahead and take a little risk of breaking things.

I added an .auto-update file in each document root of the site I want to update automatically. I changed the owner permissions of .auto-update to root:webuser so that the webuser cannot remove this file, but still I can use this file to determine the owner of the wp-content folders. I need this to change the ownership back to the website owner after updating.

Very simple and easy script, but well, the stackoverflow generation (myself included) just loves to copy ans paste right? ;-)

I put this script in my /root folder with 700 permissions. I didn’t put this in a cronjob, I keep monitoring the e-mails that Wordfence sends me to see if I need to take action.

Clean infected PHP files with sed on linux console

So I had one of my wordpress site infected. All php files were injected with bogus commands. For example, it looked like this

Infected PHP

So now what? I kind of panicked and deactivated all of my sites. Fortunately I could restore most of them because I had clean backups. For some I didn’t (probably the site which was hacked first).

The bogus all looks the same though, so it should be easy to clean this up right? When the panic was over I took some more time to get this job done on the console.

Eventually I came up with this command:

find ./ -name '*.php' -exec sed -i 's/<?php $am.*-1; ?>//' {} \;

I still don’t completely understand what’s going on, because when I try the regexp at regexr I should escape characters like ?. But well, this seems to work for this particular string. You can change it a bit to your needs. It should start with the very first characters of the bogus, $am in my case, then it uses .* to catch all characters in between, and then -1; is the end of the bogus string.

Maybe some day I may need more complex regular expressions, but for now I wanted to make sure that I documented this.

Update: As bob states rightfully in the comments; this is not a method to completely scan all of your PHP files on the server and find all backdoors. This is just a way to remove bogus code that you already identified. The signature changes with every hack, and also other techniques may have been used / planted to create a backdoor.

So this is not meant as a virus scanner command, but just a hint to show how simple injections could be removed.

REST dummy server

I must admit; even for the easiest problems I try google first. Those people at stackoverflow seem to have a solution for everything, right?

So I wanted a dummy rest server that would just serve static JSON. I wanted to take my development home, on my local machine. So I thought I’d just save some output from our API to a file, and then put it in a dummy server. This was probably too easy, Google came up with solutions that were more complicated. So for the lazyweb, I will share my solution with you. You’ll be al set in a few minutes!

I assume you already have a VirtualBox running with your LAMP stack, or maybe xampp, wamp or whatever. I used Apache for my solution.

Create a virtualhost

I must say I had some issues with this new Apache 2.4 thing, not accepting my .htaccess rewrite rules. So here is my virtual host config, so you can copy paste, and adjust it to your needs.

.htaccess

I didn’t put the rewrite rules in the VirtualHost config, but added that to my .htaccess in the documentRoot like this:

index.php

The php parses the requests, and loads the json files from disc. Nothing more to it. You could adjust it a bit and maybe mock some auth tokens as well, but for me that wasn’t required in this phase.

As you can see, the path if being converted to a filename by replacing the slashes with dashes. So now you can easily create json files for every request.

http://api-server.local/node is read from node.json
http://api-server.local/node/11 is read from node_11.json
http://api-server.local/node/11/statistics is read from node_11_statistics.json

You get the picture, right? Now, wasn’t that easy?

Alternatives

Of course there are way smarter, probably better alternatives. I tried the JSON Server, which is really cool, because it can handle the requests by a simple database which you define in json as well. But my problem was that not all our resources did have primary keys (id’s), so I didn’t know how it should handle that. Also you would have to JSON code the (piece) of database, while in my case I could just dump some requests to file.

Also, our API required more levels (e.g. /node/11/stats/12) and I didn’t want to spend a lot of time figuring out how this could be done with JSON Server.

Mock-server also looked pretty awesome, but it would probably also take me too much time to figure out how to install and configure the thing.

I kind of stopped my journey looking for dummy rests servers there, because I then realized I could build one myself pretty easy.

And now you can too, without even having to think about it. That’s what I wanted too.

HP ZBook Dock multicast problems

At work my HP ZBook is fed through a nice thunderbolt docking station. I plugin one cable, and everything is connected: power, monitors, network, etc.

Then we started working on a C# project that uses multicast to communicate. I couldn’t receive any messages. I thought it was a VLAN issue first, so I took my notebook and plugged it in the wall, using the outlet a colleague uses who didn’t have these problems with the same software. Suddenly my communication was working as well. So I ‘proved’ that the problem was the network right?

Wrong.

After hours of switching cables in the patch panels, checking traffic in the logs of the switch, I suddenly realized that by taking my laptop to another location, I wasn’t using the docking station anymore. As it turns out the network port on the docking station seems to have problems with the multicast messages.

I don’t know why, but when I use the network interface on my laptop instead of the one on the docking station, the multicast communication is working fine.

So, save yourself hours of investigating this problem, and check your other ethernet port first ;-)

Xiaomi Redmi Pro 5.5 firmware update

I recently bought myself a Xiaomi Redmi Pro 5.5 smartphone. My Jiayu was having problems with wifi that drove me crazy, so it was time for a change. Before my Jiayu I already owned a Xiaomi mi2s. I really liked the specs (compared with the price) for this Redmi phone so I decided I had to buy one.

When I received it I was very happy at first. But after a day I already found a bug; the back button wouldn’t always respond as it should. Sometimes it worked fine, sometimes it would open up the task manager where I could kill (all the) apps, and sometimes it wouldn’t respond at all. A few hours later the button could work again, or not. So that was pretty annoying, because not all apps have a back button in their app (for example when you want to return from an image in Facebook). When I enable vibrate on keypress, it did always vibrate, so I figured it must be a software problem. So let’s flash the rom. I had done it before on the mi2s and Jiayu, so I wan’t exactly a newbie, but I wasn’t really advanced either. Each time when I start adventures like this I am feeling that I am missing information. I am very thankful for people who share their experience and document their issues, so now it’s my turn to share.

The procedure

First I tried to figure out what the procedure is. What files and software do I need? I went to my favorite forum Tweakers and found a subject on the Redmi Pro. But there are several Redmi models, and several “Pro” models but that seems to be Redmi Note Pro? For example, when you check the xiaomi.eu forum, you see this:

Xiaomi Redmi 3 / PRO topic on Xiami forum screenshot

But also this:

Xiaomi Redmi PRO xiaomi.eu forum screenshot

While my phone, when I bought it, is called “Redmi Pro 5.5”. So which one is it? (Spoiler alert: it’s the latter)

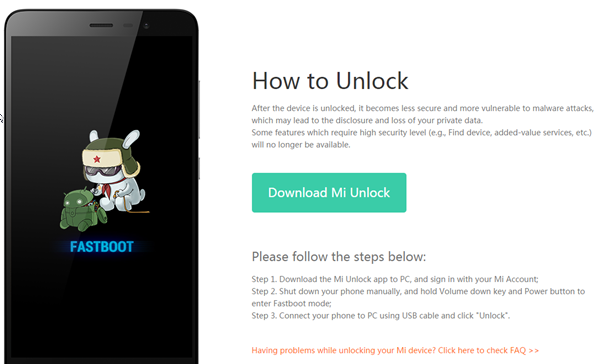
Then I also found out I first need to unlock the bootloader to be able to update the firmware. The firmware seems to be protected by ‘locking’ the phone. You need to get permission from Xiaomi to unlock it.

A lot of questions to start with, but I’ll try to answer them here.

Unlock the phone

You really have to unlock your phone by filling in a request at the website: http://en.miui.com/unlock/ .. click on “Unlock” and first on English at the bottom. For the dutch people; Tweakers has a dedicated topic on unlocking the bootloader. As far as I know, there is no way around this. You can’t hack this with other images, firmware or apps. So the sooner you place your request, the better.

My mistake here was that it turned out I have two xiaomi accounts. One was automatically created when I bought my Xiaomi mi2s and uses my phonenumber as a login name. The second one I probably created myself with my e-mail address, when I wanted to post something on their forum. When I went through the configuration of my new redmi, the Xiaomi account was also enabled, bound to my phonenumber again. Then I asked for unlock permission with my e-mail address account which didn’t match with the account on my phone.

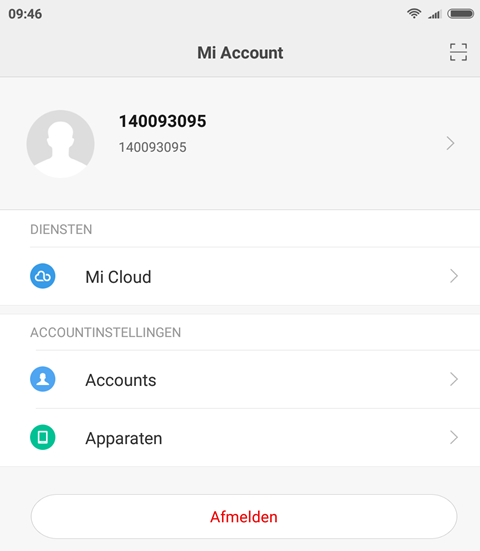
So, make sure your xiaomi login on your phone is the same as you are requesting your unlock code with. You can check this by checking out your ID, which is a number. I found I could login on this website: http://en.miui.com/forum.php and then selecting Sign in in the upper right corner. Once signed in, you can view your profile:

Xiaomi profile screenshot

This didn’t match the ID that I found in my phone settings under Accounts:

Android accounts xiaomi account screenshot

So. This was my biggest mistake that cost me a few hours, and a few days before I realized this. Once you request the unlock code with the same ID that’s on your phone, the unlock procedure went just fine.

When your id’s don’t match either, I guess your phone already created the account for you, based on your phone number. You should be able to login using the webpage as well. In my case, my username was my phone number (including country code). If you don’t remember your password, you might be in trouble, because restoring your password is a pain in the ass (I didn’t receive any SMS or email when I tried to restore my credentials). Maybe it’s better to connect your phone to the xiaomi account that you do know the password for.

Request unlock permission

To request an unlock code, you need your device to be registered with Xiaomi. In my case, there was a ROM installed that would already connect my Xiaomi account. But I read on forums this isn’t always possible. In that case you should install the developer rom first.

I tried this too, but I couldn’t get the developer rom installed, no matter how I tried. As it turned out I didn’t have to; I could already unlock my phone. I suggest you try to unlock your phone first, because this is very easy, and it won’t break anything if it won’t unlock. In my case, I could see my Xiaomi account in my phone settings under ‘Accounts’.

This tutorial describes how to bind your phone to your account to unlock it. But like I said; in my case it didn’t work because my phone was already bound. After you bound the phone, proceed with requesting unlock permissions.

But requesting unlock permission isn’t that easy either. You need to fill in a reason (it is said in forums you need to have a real reason, people at Xiaomi will manually check this). But to be able to send the form, you need to enter a pin code that is sent through SMS.

I didn’t receive the SMS on my dutch phone number. Ever.

I tried several other countries, in the end the German number seemed to work fine (twice). But it’s annoying, because you need to check the PIN code through this webpage. After that your request will be handled within a few days (max 10). Of course you will receive the notification on the phone number you entered :-(. But no worries, just login a few times a day and see if your request in accepted. You will then see something like this:

Screenshot of approved xiaomi unlock

Install new firmware

When I finally had my phone unlocked, I could follow this tutorial to install new firmware. Make sure you have the USB debugging enabled in your developer options. The versions are pretty confusing as well. At the time of writing, 7.19/20 is the newest, but this installs MIUI 8.2. You will see a forum thread, but in that thread you will find the download links.

The version you need it the omega version, or HMPro. So when you go to the download section, you need a filename that looks like this: xiaomi.eu_multi_HMPro_V8.1.2.0.MHQCNDI_v8-6.0.zip. Is the HMPro part that’s important here.

I copied the ROM by plugging the USB cable to my computer and phone. In your drawer, you can see the USB icon and if you click it, it gives you three options: charging, exchange files, and something with media or pictures. Anyways, I choose the second one. In my case my computer recognized the phone and I could you it the same way as a thumb drive.

Another option is to take your SD card out of your phone and place it in your computer. This is probably the quickest way too.

Then you need to install TWRP as stated in the tutorial, boot it, and well, basically just follow the steps in the tutorial.

I desperately tried installing the rom without unlocking my phone first (I thought maybe it already was unlocked), but this just wouldn’t work. Not with MiFlash, not with ADB fastboot, not with the updater app.

Once your phone is unlocked and you know what you’re doing, the process is actually really simple and shouldn’t take more than half an hour. In fact, downloading the rom probably takes the most time ;-)

Was it all worth it?

Yes, it was a worthwhile experience,
It was worth it.

My back button seems to work properly now, and also I was able to install SuperSu with TWRP which gives me root access. With root access I can change my DPI setting to 401, which gives the same effect as increasing the resolution on your computer’s monitor. Icons and text become smaller and you have more space on your display. So that was a positive side affect too. Also the xiaomi.eu seem to have less Chinese bloatware.

To finish it all, I installed a ZIP file that is supposed to remove a wifi speed limitation. I didn’t check my download speed, but I figured that I might as well install it while I was at it.

If you have any questions, drop them in the comments, although I doubt I can answer them ;-)

Good luck!

Phinx config for Symfony2

As you may know, you can also use a php file for your phinx config. Just replace the phinx.yml with phinx.php and it should work fine. I like to use phinx in my Symfony2 bundles, because it’s better to use in a vcs like GIT. Also you can do rollbacks, and add the migration scripts to your build script like ant.

Anyways, when using different environments, you probably have different database credentials. I put this little preg_match in the php file to parse the database config from parameters.yml. This phinx.php is located in the bundle, so for example /src/Acme/DemoBundle/phinx.php .. the migrations would then be placed in /src/Acme/DemoBundle/Migrations/ .. Just make sure the location to the parameters.yml is correct at the top of the script. You probably want to use relative paths because otherwise the path is still different in your environments. Your development VM may have different paths than your production server.


Prevent double clicks on table rows with click event and anchors

Suppose you have a table, for example to show users, and you want the table row to be clickable. If you click the row, you will go to a page that shows user information. Or maybe edit the user. But the last column of your row also has some action buttons that can delete the user, de-activate it, or whatever. So, for example, something like this:

Now, if you add a click event on the tr, when you click the button, both the button and click event will fire. To prevent this, I found this nice stackoverflow post about it. This answer suited my needs better, because I also had used font awesome icons for my anchors.

I did change it a bit however, because you already know the tr element when it’s being clicked on, right? So I ended up with this javascript code, and it seems to work.

So actually the credits go to Augusto, but I just wanted to make a note her, in case I ever forget. The tagline my external memory is for real you know. My internal memory is not always that reliable ;-)

Use Sublime Text to help you create doctrine Entities part two

In my previous post I wrote about a regexp search and replace to create Doctrine entities easily from a phpmyadmin CSV export. After that post I found myself checking my own website to copy and paste the regexp. Then I tried recording a macro in Sublime, but it turns out sublime doesn’t record search and replace actions.

Then I learnt about the feature to install packages to your sublime install, which has a really cool RegReplace package. Just follow the instructions on that page. I was a bit confused at point three, but turns out I had to go to Package Control: install package. You can go there by pressing cmd+shift+p and then type Package Control. It should appear in the list.

Then this superuser post helped me configuring the RegReplace package. It took me a while to figure out how to use extended back references. But I got it all working now. I use Sublime Text 2, so go to Preferences → Package Settings → Reg Replace → Settings – Default.

Sublime_Reg_Replace

At the replacements section I added this:

Don’t forget to enable “extended_back_reference” at the end of this file.

Then I went to Preferences → Package Settings → Reg Replace → Commands – Default and added this at the end:

Now when I am in my editor and press cmd+shift+p I can just type “Doctrine” and my command shows up. Then it’ll convert the cvs formatted table heads to a nice doctrine entity.


Use Sublime Text to help you create doctrine Entities

I don’t know about you, but when working in a projects that already exists, I am afraid to let Symfony extract the entities for my project. I’d rather just define a new entity myself. To get started, Sublime Text is very useful in creating the entity with annotations. Here’s what I do.

First, in phpmyadmin I go to the table I want to create an entity for. I use browse, select the first record, and then export this to CSV. Export to screen, and make sure the headers are in the first row.

Copy the headers to your clipboard, and then paste them in sublime text. Then first replace the comma’d with newlines, which is easy .. just search for , and repalce with \n. Make sure you have the regex function enabled (that’s the .* button).

Now the magic trick so convert the rows with column names to an almost complete entity. Again use the search and replace.

Find What: ^\"(.*)\"$
Replace With: \/\*\*\n \* \@ORM\\Column\(name\=\"$1\", type\=\"\", nullable\=false\)\n \*/\nprivate \$\l\1\;\n

SublimeText

Now you should have something like this:

If course you can alter this any way you like.

Now copy this to your IDE of choice (PhpStorm probably, right?) and finish the details.