Credly only shows First and Last on public badgepage

This year, I passed my first Microsoft Certification exam, which got me an awesome AZ-900 badge at Credly. But, to my great surprise, on the public page only my First and Last name where shown.

Where I live, in The Netherlands, it’s common to have surnames that have words like “from”, or “having”, or “on the”. So for example Gijsbrecht van Aemstel would be Gijsbrecht from Aemstel if you would translate this. In my case, my last name would be on the Field. I guess my ancestors were peasants, or maybe landlords with a big house on the field. That’s what I’d like to think.

Anyways, I always thought that the “on the” part should be in the “middle name” in forms. That middle name would be the same as what we call tussenvoegsel, which is Infix or prefix according to google translate. Now I know this assumption is wrong.

I found out the hard way after passing the exam. The Credly public page on top said “This badge was issued to Roland Akker on May 03, 2023”, so only showing my First and Last name.

Now, if you made the same mistake as me, the solution is to erase your Middle Name, and add these words to your Last Name. Unfortunately you cannot do this yourself, you need to fill in a Microsoft Certification Profile Name Change Request Form.

BUT, on this form, you only have ONE field to fill in your full name. So, then the support employees at Microsoft still don’t know what to change.You have to open a support ticket, referring to your name change request, and then explain the situation to the support engineer.

If you don’t respond in time, which is between 1 and 3 business days, your support ticket will be closed, even though you didn’t confirm that the problem has been solved.

After working on this for three weeks, I finally succeeded in having my middle name removed from the Microsoft Certification site.

The badge then didn’t have to be regenerated, the public profile showed my name correctly after reloading the page.

So basically, from my point of view, it’s just a matter of displaying the name incorrectly at Credly. I would consider this a bug. On an official thing like this, wouldn’t everybody want their name displayed in full? Or otherwise, at least make it configurable or something in your Credly profile?

I must day that this was a very frustrating process. The support engineers on Microsoft are willing to help, and usually respond within 24 hours. But due to timezone differences, that was usually around midnight for me. Closing tickets after one business day, or even three, is madness.

If you’re in the same boat as me, hang in there, eventually you’ll get it right.

Good luck!

Piwigo nginx problems

By piwigo website was broken; when I uploaded new pictures, they would not appear on the page. At first I thought resizing with GD was the problem, but switching to Imagick didn’t help either.

The rewrite rules of nginx turned out to be the problem.

I had a location block in my virtual host that would serve static files directly. But this rewrite rule was hit while the uploading process was trying to use the i.php script for processing the upload.

The easiest way would be to just remove the static file serving part, but instead, I tried looking for a regex that would still serve static files directly, but just not the ones that needed processing. So, in fact, the ones starting with /i or /i.php.

So, eventually my virtual host looks something like this:

Google Family Link won’t unlock your child’s device

You’re on a holiday with your mobile home, no WiFi, lots and lots of stuff to play with for your kids. Board games, books, toys, climbing equipment, swimming pools. So what do they want? Their tablet or mobile phone, obviously.

Same here.

So at the end of the day, our kids are usually allowed to spend a little time on their devices. Being a responsible parent using Google Family Link, you add some bonus time, or try to unlock the device, which somehow doesn’t work. The device doesn’t have WiFi, so the Google Family server can’t reach your child’s device to tell it: hey, it’s okay, you can unlock now.

Normally we just enter the parent code, and then it’s unlocked for the rest of the day. This usually works even when WiFi is unavailable. Except this time, that didn’t work either. I guess the parent codes are being refreshed once in a while when the device has internet access. Maybe if a device hasn’t been connected to the internet for a while, it is unable to refresh these parent codes?

Anyways, rebooting the device didn’t help either. What options do you have left, when you cannot do anything because the tablet is locked?

Mobile hot spot to the rescue! Simply use a phone that has mobile data through 4G or whatever. Create a WiFi hot spot with the same network name and password as at home, which the tablet already knows. The tablet will connect to your phones hot spot, and now you will be able to unlock it using a Google Family key, or just disable the limits or whatever.

I just tried this with my son, and in his case, this works!

After the tablet is unlocked, disable the hot spot and off you go.

Resize Ubuntu disk in VirtualBox

So after developing for a couple of years on my VirtualBox Ubuntu server, the 32GB I had allocated wasn’t enough anymore. So I wanted to add some additional space, without loosing my files of course. I have a Ubuntu Server 18.04 with a LVM partition. So I would see something with /dev/mapper/blabla in the df -h.

As with a lot of things that I wrote on this blog, I couldn’t find an easy step-by-step thingy to follow for my specific case. Most of the examples used gparted, but I have Ubuntu Server, so no GUI at all. Others used the VBoxManager command to resize the disk.

In hindsight it was pretty easy, so, let’s go.

Step 1: resize the VirtualBox image

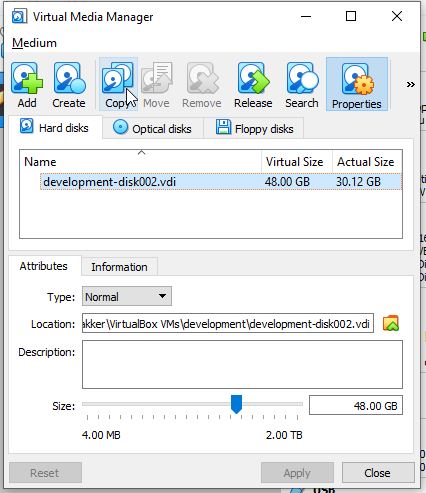
You can use the VirtualBox UI to do this pretty easily. Make sure your virtual machine is shut down. Then go to File, Virtual Media Manager. Select the disk image that is bound to your virtualmachine, and use the slider to add space to your disk image.

Step 2: resize the partition

I couldn’t find a decent way to resize the partition using the console, that I would dare to execute without being afraid to loose all my files. Eventually I found the link to the gparted live cd.

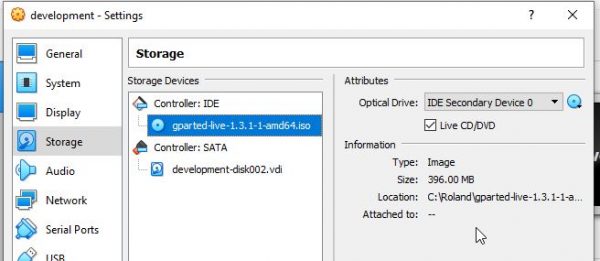
Download it, and mount it as a live CD to your virtual machine.

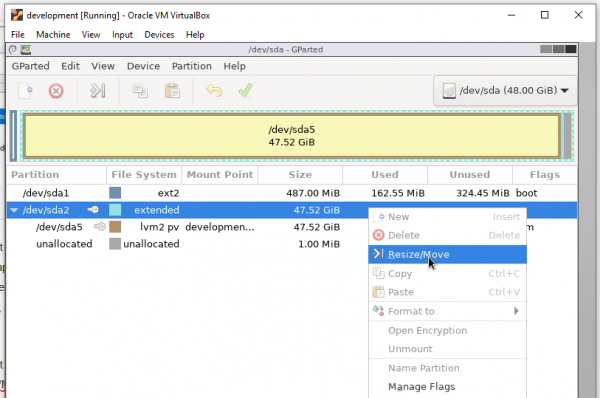
Now just boot your virtual machine, and boot with the default settings. You will end up with a bare GUI, start gparted. In my case, my swap partition was at the beginning of the partition table. That was easy; because I could just resize the existing partitions. If your swap partition is in the way, just remember the size, delete it, and create it afterwards (as suggested in this youtube video).

As in this video, just select the partition, right click, and select Resize. I did this for both the extended file system on /dev/sda2 as the LVM partition.

After you selected Resize, just move the slider to the right. So first for /dev/sda2, then for /dev/sda5.

Now remove the live CD, and boot your virtual machine again.

Step 3: expand LVM

Now you need to expand the LVM partition. That’s just two commands.

and after that:

Of course you need to change the /dev/mapper/blabla thingy to whatever your LVM partition is.

That’s it! df -h now shows the new size.

Show date in other timezone with correct locale

We want to show the date / time in the timezone of the user, but also in the right locale. Unfortunately, strftotime doesn’t seem available for the DateTime object. So I ended up with something like this… I assume you did setlocale somewhere else in your project to make sure PHP is in the right locale.